 & CrystalSolutions& CrystalSolutions
Schedules
|
Note: |
Help on specific screens such as this one is dealt with thoroughly by the Page Help facility. Information included here is supplementary to that provided in the Page Help, which should be checked out first. |
Introduction
The Schedules functions provide a fully-featured diary capability, which can give your users rapid access to their appointments and/or key tasks. The layout has the look and feel of a standard diary; showing previous, current and next month dates, and key annual dates (such as Christmas or Easter).
When you click on a date, you are directed to the Day View for that date. Similarly, if you click on a week, month or year, you are directed to an appropriate screen for the command. In Schedules Month View (the main schedule screen) any location where the mouse cursor changes to a hand, can be clicked on and you will be directed to another screen.
Main Screens
The initial Month View screen is shown below, with all the click-able areas encircled. A description of each follows below.
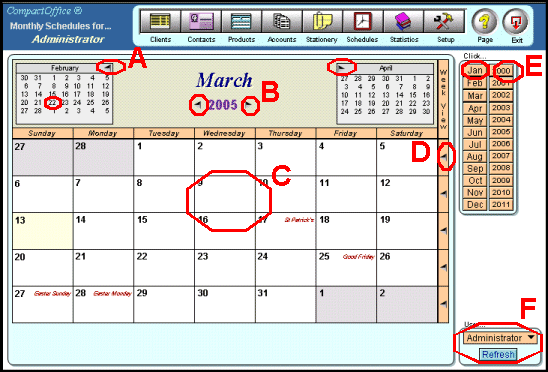 |
A - Arrow keys for moving back (or forward) by one month. You can also click on specific dates in these smaller areas.
B - Arrow keys for moving back (or forward) by one year
C - Main date buttons - click on these to go to the Day View for a specific date
D - Week View buttons
E - Month and Year buttons. These change the current view to reflect the chosen month and year
F - Special (Administrator only) region for switching between user diaries
Days from previous months are greyed-out (but can still be clicked on) and the current date is always high-lighted in yellow. The next screens encountered when clicking with the mouse, are the Week, Day and Time Views, thus:
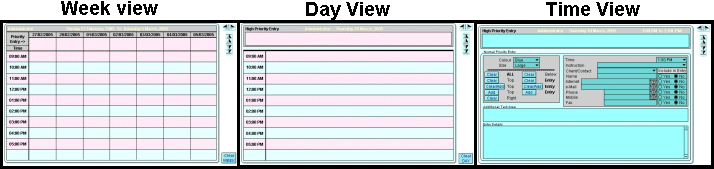
You can always get to the Time View (the main data-entry screen) within two mouse-clicks from the Month View screen. In the Time View, you can enter high-priority appointments (or whatever) and they will appear in the Month View and you can enter normal-priority (normal diary entries). There is enough space in the Month View for the first 3 lines of high-priority text. No normal priority entries appear on the Month View. If you want an entry to appear in the Month View, it has to be added to the high-priority field in the Time View.
All these command are available in the Time View screen, as simple mouse-clicks.
You can add client information using the popup-list provided. When you choose a client/contact, the fields below it are automatically filled out for you. Any fields you do not want included in your entry can be ignored by clicking the appropriate Include In entry button.
![]()
Further details about this screen are available in the application's Page Help facility. If you require assistance regarding any part of the product, please contact us on: Support@CrystalSolutions.org
We can add further information fields to any of the application's screens (where there is space for the addition of fields). You can place a request with our support team, who will be happy to take down the details. However, inclusion of new information-fields into a released version of the product, depends on the general suitability of the fields in question.
Alternatively, we can provide you with a customised version of the product, at your request. For details about creating customised applications and all our other services, please e-mail our sales department on: Sales@CrystalSolutions.org
| Copyright © 2005 Cyberzoic Software Ltd. & CrystalSolutions All Rights Reserved. |