 & CrystalSolutions& CrystalSolutions
CrystalSolutions .............. Start Guide How Do I ? Index
The Installed Product
You should now have a program folder called CrystalSolutions on your system.
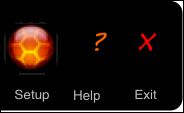
There are shortcuts on the desktop. The CrystalSolutions icon initiates the program. There are three icons that provide help of some form. The Help icon provides access to the application's main help files. The Quick Start icon provides a treatise on how to start using the application, and the Readme icon contains any late-breaking news, FAQ's and other items of version-specific interest.
The Start / All Programs has The Uninstall icon which removes part or all of the application from
your computer as well as the CrystalSolutions icon which initiates
the program
Firstly, you should always make a back-up of the main database file. This is situated in your chosen directory and has the name crystalsolutions Copy.USR . In the day to day running of the application, you would not open this file at all. You must always open the executable file CrystalSolutions .exe (on Microsoft Windows based platforms) (which opens the database file itself in the correct manner). If you always access the program using one of the icons on the desktop (or Start Menu), then you will always open the correct file. However, if you use Explorer (or similar) to locate the executable file, make sure it is the correct .exe file that you click on.
* On the Mac just click CrystalSolutions!![]()
* Firstly, make a backup go to Setup, choose System and there you can set up a regular backup - while you're there you could also set up your default Practice, Practitioner, Therapy and if you have a large moniror set the screen size to 150
|
Click on the CrystalSolutions icon and start the program. The first time you do this you will be presented with a Welcome screen since you will have been automatically logged on as user "user" Initially user has no password, so the login screen does not appear. If you subsequently give "user" a password (or login as someone else) a login screen (like the one on the right) will be displayed at application start-time. Several users have been setup for evaluation purposes. Most of them have no password, so all you need to do with the logon screen is click on the OK button. |
 |
* to get the program to set your computer name as the default User run "add user's name" in the Scripts Menu, or in Setup, click Users tab, and click "user's computer system name" which is below 'Login' in the centre Right of the screen . If you don't use a password , you will be able to use the program without logging in.
The Welcome screen only appears the first time you enter the application. It outlines several important points about the product in Evaluation Mode (the mode the product is in prior to registration using a purchased license). While you are running in evaluation mode, you should not create more than 30 records in any of the main database tables. If you do so, a warning screen appears, requesting that you delete some records.
If you ignore these (intentionally obtrusive) messages and create more than 50 records in any of the main database tables, the product will cease to function and will need to be re-installed to continue any evaluation.
The evaluation mode will run for a maximum of 30 days or 240 hours (equivalent to 30 days at 8-hours per day). In a similar manner to the 50 record limit shut-down, the application will cease to function after this period has elapsed. After a shut-down occurs from either cause, you should either register (purchase) the product or remove it (and its associated documentation) from your system.
Clicking on the Continue button at the bottom of the Welcome screen takes you straight to the first record in the clients table (and the clients screen). The application comes with the Demonstration Business-Model in force. This means you will currently be viewing client details using a standard demonstration screen with no extra information displayed. This is generally true of all three available business models at the current time, but this situation will change in the near term.
|
To the top right of this screen and in fact, most screens, is a Page Help button. Clicking on this will take you to the built-in help on the topic you are currently viewing. Every screen that needs one of these, has one and the information provided by them is intended to be thorough. You should not need to go to the main help (using the F1 function key or Help menu option) for further information about the features of a particular screen. The Exit button simply ends the application (data is always saved before exiting). |
|
Across the top of each page is a Navigation Bar, used for moving around the various parts of the product. If you now click on Page Help and then click on the top region of the displayed picture (the navigation bar), you will be presented with an explanation of the the function of the navigation bar. To see all the available help-text below the picture, just click anywhere in the text-area and (if appropriate) a scroll-bar will appear, so that you can scroll down to see the remainder of the text. All help screens have this feature, as do many of the text fields in the application.
The Navigation Bar
The navigation bar is present on most of the key screens in the application. You use it to get to client, contact or patient details, to view products, to add accounts records, to configure and print out stationery, to look at diaries, or configure the application.
 |
When you change business models, the title below the Clients button, may change to better suit the chosen model. |
Some areas of the product contain too much information to display on one screen. These areas have links to other supplementary screens at their base, where either a page number or a specific title can be clicked on, to navigate to the next in a sequence of pages. This is true of Clients/Patients which has up to six pages, depending on your Business Model...
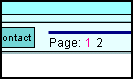 |
The Demonstration Business Model contains two pages labeled 1 and 2 (the current page is always shown in red). The Standard Business Model is currently identical to the Demonstration model, but is expected to change in the near term. The Therapy Business Model has six pages and is designed for Complimentary Medical Practices and Podiatrists to input treatment regimes and other patient information. |
The Record Navigation Bar
|
Down the right-hand side of many screens is a record navigation bar. It is a valuable assistant in many frequently performed tasks such as:
A popular use of the record navigation bar is to perform a Find (for instance, on Forename *o* - locate all records with an "o" in the forename), and then click the List button. You will be taken to a listing screen containing only your found records (in the supplied evaluation data, four records will be found). |
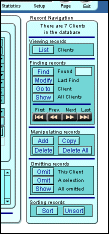 |
Once again, the Page Help provides more information on the record navigation bar. In particular, clicking on record navigation bar area in the page help picture will provide a detailed description of it.
CrystalSolutions Setup - Users
It is difficult to avoid the Setup area at an early stage of evaluating the product. It contains the many configurable items that affect how you login, what you see and how various things interact. An understanding of the product's setup parameters will undoubtedly help in mastering the finer points.
If you navigate to Setup now (using the navigation bar at the top of the screen), the first screen you will see is entitled Setup - User Accounts. This screen and it's sibling screen Setup - User Access, provide most (if not all) of the security for the product.
* to get the program to set your computer name as the default User run "add user's name" in the Scrips Menu, or in Setup, click Users tab, and click "user's computer system name" which is below 'Login' in the centre Right of the screen. If you don't use a password , you will be able to use the program without logging in.
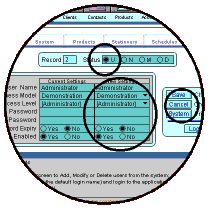 |
The circled area at the top is the Status field. This just indicates whether you have changed anything (ie. the user name, the password, etc). It is initially U (for unchanged) and can become N (for new user), M (for modified existing user) or D (for deleted user). Changes only take effect after you click the Save button. You can cancel at any time using the Cancel button. In the picture opposite, Administrator is showing. This user has [Administrator] authority and will see the Demonstration model data fields when viewing client information. The evaluation data has the user Administrator with full access authority. This is [Administrator] authority. There are four authority levels explained in detail in the Page Help; [Low Level], [Medium Level], [High Level] and [Administrator]. You will notice that Administrator has no password - feel free to change it and see what happens to the Status field. You enter your new data in the New Settings column. Your original settings are displayed in the column to the left. You can login to verify your new password, using the Login button. When you type a new password, each character should appear as * (asterisks). If they do not, this means that the install program failed to install the password-font into the system appropriate directory. This problem can be rectified at any time. |
|
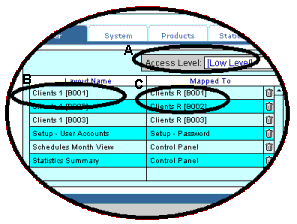
To display the Setup - User Access screen you need to click on the word Access at the bottom of the screen. This screen contains screen-mapping permissions, based on authority level. For each Access Level (in the popup-list in circled area A), you define the screens that any user with that access level, will be guided to. In the example displayed, any users with Access Level [Low Level] who click on Clients in the navigation bar, will actually navigate to a restricted client screen (Clients R [B001] instead of Clients 1 [B001]). The [B001] refers to the active Business Model (in the current version of CrystalSolutions , 1 is Demonstration, 2 is Standard and 3 is Therapy). If you click in the circled areas B and C, popup-lists will appear with all the possible screen mappings. In simple terms, the left hand column represents a screen a user wishes to navigate to, and the right-hand column is what they actually get when they try to navigate to that screen (a mapping). The mappings supplied with the evaluation version of CrystalSolutions are suggestions only. Please refer to the Page Help for more information regarding Access Control. |
 |
A simple way to verify that access control is working as you wish it to, is to login as someone else (a user with [Low Level] access) and see what happens when you try to navigate to the Setup screens. Leaving the mappings as they are, return to the Setup - User Accounts (clicking on the word Accounts at the bottom of the screen) and login as Reception. Reception is a user with [Low Level] access-authority, provided as part of the evaluation data.
Aside: If you are ever unsure about who you are currently logged in as, you can click on the Schedules button in the navigation bar. This screen always shows the calendar (diary) of the currently logged-in user, when it is first displayed.
Now you are logged-in as Reception, try navigating to clients and then back to setup. You will not be able to get back to the screen you were just working in. To actually return to the Setup screen, you will have to exit the application and start it again, logging back in as Administrator.
CrystalSolutions Setup - System
* Firstly, make a backup go to Setup, choose System and there you can set up a regular backup - while you're there you could also set up your default Practice, Practitioner, Therapy and if you have a large moniror set the screen size to 150
The System screens are where you configure such things as:
The Business Model (Demonstration, Standard or Therapy)
Whether you want Product Tips to appear when you enter the application
The currency and tax applicable to your business
When (and if) you want automatic database back-ups to occur
If you want a reminder screen of things to do, to popup when you enter the application
Whether you want the client screens to reflect a period of inactivity (the Review Period)
The Help - Program Path applicable to your operating system
- setting up your default Practice, Practitioner, Therapy, Account and if you have a large monitor set the screen size to 150
|
and, where you import and export data to (and from) the product. Importing and exporting is available by clicking on the Exports button at the bottom of the screen: |
 |
By changing the New Business Type field (a popup list), you can change the business model even when you are logged on to another business model. Currently there are only three available business models. However, this situation is expected to change rapidly as the product evolves (with your assistance).
Currently, the Demonstration and Standard business models are identical. The former will always remain the simplest for evaluating the product, whereas the latter is expected to change rapidly as we implement your suggestions (and a few of our own). The Therapy business model is the most developed and contains three pages of medical related items, such as treatment regimes and medicines prescribed, etc.
You can switch business models at the click of the Refresh button (once you have chosen a different business model). Having done that, subtle differences will appear. For instance, the word "Clients" is replaced by the word "Patients" throughout the product, and there are now three Patients pages accessible from the buttons at the bottom of the Patients 1 page.
CrystalSolutions automatically gives you context-sensitive help (specific to the current screen you are viewing), unless it fails to locate the operating system's help-program, hh.exe. If you are not receiving context-sensitive help, you can try to locate the help-program yourself, using the System Setup - General screen.
| When the help-program has been located successfully by the application, the Help Program field Status will read VERIFIED. | 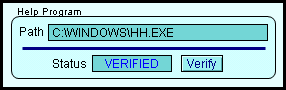 |
| If the help-program path has not been located successfully by the application, the Status field reads UNVERIFIED. In this case, you will have to locate the hh.exe file yourself, in order to receive context-sensitive help. | 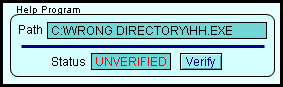 |
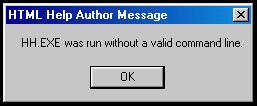
| When you type the correct path
into the Path field and then click
the Verify button, the help-program
is verified by actually running it. The screen on the right will
appear...
Simply click on the OK button to complete the verification process. |
 |
Import/Export...
|
IMPORTANT: For the evaluation phase (the mode the product is in prior to registration using a purchased license), do not use the Import function at all, unless you only intend to import one or two records. The product will cease to function if more than fifty records are present in any of the main database tables. However, feel free to export what you like from the available selection of buttons. |
The Exports screen contains everything needed for bringing your data into the product and moving it out of the product. The most important fields for all the main database tables are catered for and you can import or export data by the click of a button.
The format of exported data is automatically taken care of; data will be copied from a table to a file in an appropriate sub-directory of the CrystalSolutions \Bin\Export\Data directory. Because the exporting of data is automatic, it is essentially risk free.
That is not the case for importing data. When you import data, you must ensure that key fields are appropriate for the particular database tables you wish to import data into. In particular, the ID fields for all the tables must be unique. So, you need to check the existing ID values do not conflict with any of the new ID values and that all your new ID's are unique.
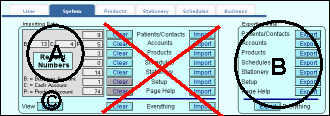 |
It is inadvisable to use the Import feature until your application has been registered. If you press any of the Import (or Clear) buttons, you will receive a warning message, but you can still use the functions. The Setup and Page Help Clear buttons are permanently greyed-out. Both the setup and page help database tables should never be emptied, since they both contain data that is vital to the successful running of the application. Encircled area A displays the numbers of records currently in the appropriate tables (for comparison before and after an import operation). The encircled area B contains all the Export buttons. To see the completion status of an import, you can click on the Status button in encircled area C. To see the completion status of an export, simply go to the relevant Export\Data directory and view the file. |
CrystalSolutions Setup - Products
There does not seem to be much going on in the Setup - Products screen. There is only one small area that covers Field Locking. However, the Field Locking system of specifying product attributes is the secret behind using one products screen to cater for every business type. The product comes with Field Locking set to On.
|
Firstly, navigate to the products screen and have a good look at the fields presented in the middle of the screen. These are in fact, user-configurable fields whereby you specify the title of the field (eg. Maker) and also what goes in the field. There are five popup-lists (the left-hand fields) and five basic fields (the right-hand fields) to choose from. |
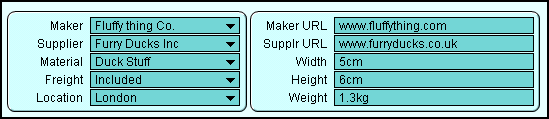 |
Returning to the Setup - Products screen, click on Field Locking to set it to "Off" and click on Refresh. Now, return to the Products screen and you will see a completely different screen. This new screen is where you define the product fields for your business.
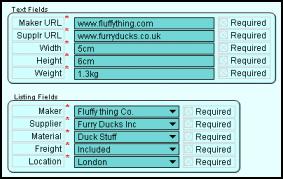 |
The names to the left of the actual fields can be over-typed to suit your products. For instance, in the picture "Maker URL" could be replaced by anything relating to your product; colour, material, etc. A red asterisk alongside a field just denotes that it is modifiable. If you do not want all ten fields displayed, just clear the Required field (so that there is no X in it). To maintain symmetry (for both the products description and catalogue screens), it is advisable to use the upper-most fields from the basic and popup-list sections for your products, rather than clearing one or more of the fields higher up the list. Back in Setup - Products, set the Field Locking to "On" and click Refresh. Now, when you go to view the products, your new field names will appear alongside the fields, and any that you cleared will not appear at all. |
CrystalSolutions Setup - Stationery
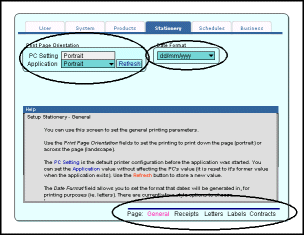
The Stationery screen consists of several system-wide parameters for setting the orientation of anything you print automatically, and for setting the format of the date as it will appear on letters. The appearance of dates on receipts and contracts is always the same as your PC's date format (either dd/mm/yyyy or mm/dd/yyyy).
|
To ensure that any new setting for print-orientation takes effect immediately, click on the Refresh button. At the bottom of this screen are the navigation buttons for the other stationery screens. There is one for each type of stationery currently available in the product:
|
 |
On receipts and labels there are text (or image) fields where you can specify text or images to appear on receipts or labels. You specify images using their location on your hard-drive. The image paths included with the evaluation data, show a file-path that is relative to the current working directory (ie. the directory that the application is in).
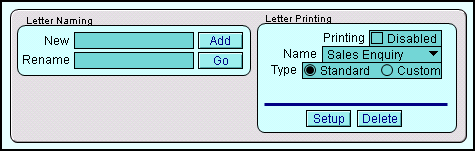 |
All four types of stationery are similar in the way you set them up, so only letters will be discussed here. Navigating to the Letters option, you will see the parameters displayed on the left. |
All four types of printing setup ( Receipts, Letters, Labels and Contracts) have parameters for:
Disabling printing - This applies to automatic printing only (for instance, when sending customer reminder letters) and is used for periods when the printer might be out of action, etc.
The Print Type - The Standard or Custom print type gives some flexibility in the way items such as receipts are printed out. The current version of the product has two principal types; LH Picture and LH Typed. The former displays a picture letter-head at the top of your chosen stationery item and the latter displays a text letter-head of your choice. When you click on Custom, a popup-list field will appear, thus:
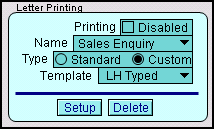
The Template field contains the types of printing available for a particular stationery type. In the picture shown above, letters will be printed out with a typed letterhead. This could be your business address or a thank-you message.
The Letters screen differs from other stationery screens in that it includes fields for providing new instances of letters. In fact, there is a whole database table devoted to saving the letters you create here. You type in a name for your letter in the New field, then click on the Add button. This takes you to the printing screen for Letters, where you can edit your new letter. The upper part of the printing screen for letters is displayed below:
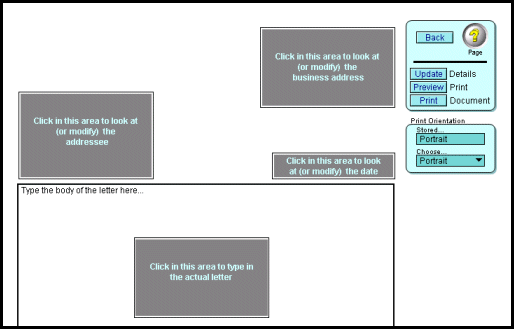 |
You can click on any of the grey boxes to add your own text to the address, addressee, date and letter fields. Alternatively, you can click on the Update button and any parameters that you have previously set up will be automatically displayed (we haven't come to that yet - that's covered by Setup - Business below). When you are happy with your letter, you can preview it using the Preview button. In Preview Mode there is no interaction with the displayed data. You cannot modify your letter here; only view it to check for spelling mistakes and how it will appear on the printed page. The Print button can be used when you are ready to print the document out. You can use Portrait, Landscape, the print-orientation stored with the letter, the application setting (that is the value of the print-orientation field in Setup - Stationery General) or your PC's current setting. |
|
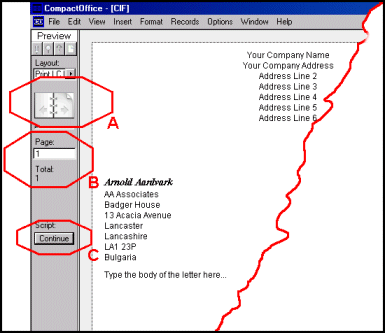
In Preview Mode, you can see your letter, but there is also a navigation assistant (the grey area down the left-hand side of the screen). The important parts of this navigation assistant are:
Aside: The address details displayed on the picture are what you would see if you had clicked the Update button using the evaluation data. Click on the Continue button to return to the print screen. Then click on the Back button to return to Setup - Printing. |
 |
CrystalSolutions Setup - Schedules
The Setup - Schedules screen consists of parameters for defining your calendar - the start and end dates, the calendar-day, you appointment divisions and the access level required to view other people's calendars. There is a status area for viewing the completion status of the various calendar procedures (some of which can take a long time to complete).
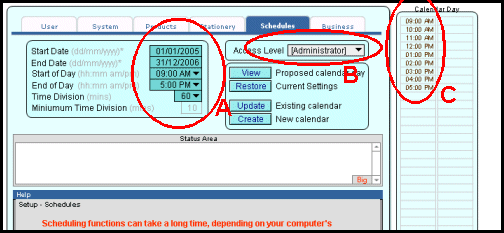 |
When you first install the application, there is a calendar present. but if You need to recreate it, use this screen. If you click on the Create button, the application calendar will be created, for dates between 1st January, 2005 and 31st December, 2006 (area A) It will be a (very boring) 9:00 AM to 5:00 PM calendar, with 60-minute time slots (area A). Also, users with an access level of [Administrator] will be able to view other people's diaries (area B). You can test out a calendar-day by specifying times in the start and end of day fields, and a time division (in minutes). Area C shows how the appointment slots will appear, if you go ahead and Update the calendar. |
When there are many lines of text in the status area, you can click on the Big button in the bottom right-hand corner. This will take you to a larger version of the status screen.
IMPORTANT: When you Create or Update a calendar, the screen will flicker and may go blank for a period of time. The create and update procedures take several minutes to complete, depending on the size of your calendar. The size of the calendar depends on how many years you want the calendar to cover, the length of your calendar-day and it's time-divisions, and the number of users configured on the system.
If you have created a calendar, you should now be able to navigate to Schedules (using the navigation bar at the top of the screen) and view your calendar for the current month.
Returning to Setup and the last category in the current version of the product; Business.
CrystalSolutions Setup - Business
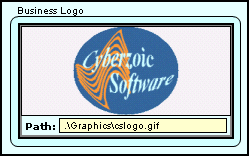
There are two Setup - Business screen, for typing in your company address (which can appear on receipts and letters), for specifying a company logo image and for specifying a letterhead image.
|
As with all images throughout the product, you can right-click in the area covered by the image and specify a path to the image you wish to use. The Insert Picture menu option is provided for this purpose. Alternatively, you can specify the path to the image as shown on the right (in the yellow area). |
 |
Setup - Schedules screen consists of parameters for defining your calendar - the start and end dates, the calendar-day, you appointment divisions and the access
![]()
Congratulations, you have just finished the painful task of evaluating the Setup area. Everything else is plain sailing. Please feel feel to navigate around the product, clicking on things; seeing what they do and considering how how might use them to your advantage.
Remember to take a back-up of the product - the original file you down-loaded should suffice, while you are evaluating the product.
CrystalSolutions .............. Start Guide top How Do I ? Index
If you need any assistance running the product, please e-mail Support@CrystalSolutions.org
| Copyright © 2005 Cyberzoic Software Ltd & CrystalSolutions. All Rights Reserved. |